Showing posts with label Guest Bloggers. Show all posts

Monday, February 27, 2012

How Twitter Helps Overcome Inequity With Rural Internet Access

Last week was guest post week here, but I messed up on the scheduling of one post by Tanis Thiessen. Therefore, I'm starting the week with one last guest post.


While it seems like “all the world” is accessing the internet freely and quickly these days, the truth is that there are still areas in Canada where high speed internet is unavailable. In our rural K-12 school in southern Manitoba, approximately 20% of our community has access to the internet only through dial-up, with the rest having access through high-speed connections. So how can we communicate in a timely fashion, using technology to reach ALL of our community, when dial-up is an obstacle? The answer--tweet!

Set up your school with a twitter account, and all your stakeholders--parents, students, board members, the community--can easily get up-to-date information on their handheld devices. We regularly use our Twitter account to send out calendar updates, school assembly information, articles on current topics in education, and “what’s happening in class now” pictures.

           Sports events, dramas, concerts, in-class projects, new equipment, guest speakers, monthly themes are all highlighted. Through short tweets and quick pix, community members stay connected to the pulse of the school.


We try to make our account easy to find, adding a “Follow Us On Twitter” button to our wiki page (http://thecreek.pbworks.com). This is an easy way to guide people to our Twitter account, and bonus is that these buttons are free from many sources on the ‘net. (Ours came from Twitter Buttons, http://www.twitterbuttons.com).

Realizing that Twitter limits our interactions by the brevity of the posts, we try to make our communications with the community as multi-faceted as possible. We send email attachments of our newsletter and monthly calendar to parents who request it, while posting it on our wiki makes it accessible to those who prefer that venue. Teachers use Edmodo, Moodle, Google Docs, and the school’s wiki to provide various methods for students to stay up-to-date on classwork and utilize their tech skills to meet educational outcomes.

Twitter is a great way to keep stakeholders informed of your school activities. Parents appreciate the calendar updates; students appreciate the pictures and links to cool websites; businesses supporting our students through apprenticeship appreciate the free advertising given through mentions in tweets throughout the year. In an area where dial-up could prevent timely communication, Twitter helps overcome this rural inequity.

Elm Creek School, part of Prairie Rose School Division in south-central Manitoba, is a K-12 school of approximately 200 students and 16 teachers. Our building is nestled in the small but robust community of Elm Creek, 40 kilometres southwest of Winnipeg, capital of Manitoba. Our school provides a wide variety of programming for students, utilizing interactive TV connections for some classes, online coursework for others, technical-vocational opportunities through Carman Collegiate just 15 minutes south of us, and in-house teacher-led coursework. We have three Smartboards, 1:3 computer-to-student ratio, a high school science lab with university-grade equipment, two computer labs, a gymnasium with mezzanine for weight training, and a canteen that serves homemade lunch specials daily.

Elm Creek School has a thriving daycare and preschool program run by a community group that uses our building, and we offer some adult coursework in the evenings. We have an elementary music program, a high school band and choir program, technology courses, career and technology studies with apprenticeships available through community partnerships, and an incredibly supportive Parent Advisory Council that has upgraded our outdoor play spaces and will soon be upgrading one of our two computer labs in the building.

About the Guest Blogger
Tanis Thiessen is a school administrator in Elm Creek, Manitoba. You can follow the Elm Creek School Twitter feed here

Thursday, February 23, 2012

Teaching in a 1:1 Environment in Maine - Guest Post

Editor's note: Whenever I travel out of Maine, teachers ask me about Maine's 1:1 MacBook program for middle schools. Since I don't teach in a middle school, I thought it would be good to share the perspective of a Maine middle school teacher. 

The great thing about teaching with technology is that it can open new doors for your students. However, you have to be willing to walk through that door with them in order to see those benefits. Since you’re reading a blog entitled “Free Technology for Teachers,” I’m guessing you’re already there.

The trap too many of us fall in to with technology is that we’re just doing the same things we’ve always done, except now there’s a computer involved. Sure, there are some “21st Century Skills” that students achieve (often times we falsely assume through osmosis), but at the end of the day, showing video clips on Youtube is no different than popping a video in the old VCR.

Likewise, much of the same classroom management challenges we faced before we introduced laptops to our students are still there and are manifesting themselves in new ways. Too often I hear teachers blaming these classroom management problems on the technology itself, rather than the real root causes. Texting is just note passing. Even with technology, you still need clear and consistent expectations, engaging lessons, and an understanding of how the adolescent mind works.

In my room, the desks are arranged in groups that face each other to encourage collaboration among students. Some teachers dictate how their classrooms should be physically arranged based on the need to “see” every student’s screen. I made my decision based on what I felt would be best for my students in the long run, not the need to have a semblance of control (an extra benefit is that it encourages me to move more in my classroom to assist students and monitor their activity instead of sitting at my desk and staring at the back of my students’ heads).

To really revolutionize our classrooms, we have to fully embrace Web 2.0. At the end of the day though, the things that make Web 2.0 great- collaboration, peer feedback, real-world application- are the things that have always been the key ingredients to great teaching. The upper levels of Bloom’s Taxonomy don’t change because you’re connected to the internet. It’s the fact that you can now access and create content on an international level, twenty four hours a day, seven days a week, that makes it truly powerful.

In the past, great teachers have struggled to engage their “hard to teach” kids across the learning spectrum. However, we now have a limitless amount of resources at their fingertips. We live in an age of self-guided learning, where students can access huge amount’s of college-level material from MIT and Yale. If the technology your student needs isn’t out there, they can create (and monetize) their very own app to get the job done! The possibilities, for once, truly are endless.

We have always known that learning never stops, but now we have an incredible amount of resources that make it easier than ever before. If you’re a great teacher, you’ll still build your learning activities with those key elements like you’ve always done, except that the doors you open for your students will be more limitless than ever before. 


About the Guest Blogger
Ryan Reed is a second-year middle school teacher in Maine, where seventh and eighth grade public-school students and teachers have been provided Apple laptop computers for the last decade. You can connect with him on Twitter.

Creating an Online Classroom With Posterous - Guest Post

© Nathan Hall
Before becoming an English language teacher, I had primarily worked in the photographic industry as a salesperson, manager, and teacher/trainer. I was a prime example of the old adage, “those who don’t, teach” since I don’t have an artistic bone in my body (I blame my older sister for taking all the talent with her when she was born). My focus was on the technical skills, helping people learn how to use their cameras, especially during the seismic shift from film to digital. Once I started teaching English, I thought I would never again have the opportunity to use my photographic knowledge in the classroom. I was wrong.

Shortly after moving to a new city and starting a new teaching position at a language school, I was approached with the idea of starting an English and photography class. I had never even considered the idea before, but since I was in the middle of a curriculum development class for my MA TESOL, I thought it might be an idea to explore further. I scratched out a few ideas and started planning my course with the idea of integrating the four main language skills into a content-based photography class. Knowing that it would involve a fair amount of technology, I sought out a place online for the students and myself to post and share what we were learning and creating during the course. It would be a spot where I could post classwork, lectures, and homework and the students could share their creative projects, presentations, and homework. That was when I came across Posterous.


There is a plethora of blogging and online website creation options such as Wikispaces, Blogger, Wordpress, etc., but I wasn't overly impressed with how each of these sites handled images and documents and didn't feel that they were simple enough for what I was asking the students to do in the class. I wanted a place where photos could be displayed in a gallery type viewer, presentations could be watched, and documents such as PDFs could be read and downloaded. Sure, some of these sites could do this with the help of other online tools such as Flickr, Picasa, or Scribd, but I wanted it to be straightforward and simple for the students.


With Posterous, I can integrate photos into the post as a gallery, upload documents and presentations directly into the post for the students to view and download, and students can contribute and comment. All of this could be done without third party plugins or storage limits.

The following are some of main features of Posterous I think that could be useful in the classroom.


Mobile use: With mobile apps for iOS and Android, it is easy for students to read, post, and comment directly from their smartphones. Students even posted pictures and did homework directly on their phones. Also, each Posterous site is automatically created into a mobile site making it easy for the teacher to create interactive classroom sites that students can view anywhere. I even have some of my students doing their homework on the bus ride home. 
© Nathan Hall


Embedded files: Posterous automatically embeds files such as videos, audio files, documents, and photos without installing any plugins or using HTML codes. Photos are put into a gallery that can be viewed fullscreen, PPT presentation are converted and can be played fullscreen as well, and videos and audio files are put into their own players to be used directly on the site. This is really helpful when you want to have students give presentations on a SmartBoard, give them listening homework, or you just want to use something in class. Also, there is no limitation on the amount of space you can use for the files.


Simplicity: Everything on the site is meant to be used with the minimum amount of learning. While other sites are more flexible in regards to expansion and customization, the functions of Posterous are more than enough for a class site while making it easy on learners to use.

Integration with social media: Posterous allows for autoposting to various social networks and also has links at the bottom of each post for sharing on Twitter and Facebook. This can be turned off quite easily if the teacher wants to remove it. I found it was nice for students to be able to share their work on their favorite social network and gave them a sense of pride regarding their work.


Email posting: This is an excellent option if a teacher doesn't want to make students register for Posterous. I had one class where I had the students email in their homework to the site instead of web posting. The email posts did not appear on the site unless I moderated it. This way, I didn't have to give my students my email address and they could ask questions at any time. Email posts with attachments will automatically embed the files into the post.

Posting information from other sites: Posterous has a wonderful bookmarklet that allows users to post text, videos, or photos directly from other sites. This can be used in a WebQuest style format and then students can comment on each others discoveries.

Price: Free. Can't get any better than that. Oh, and ad free, too.


Posterous can also be a helpful tool for professional development. Our school has started using a Posterous site for teachers to share ideas and post questions. The ease of adding and removing contributors to the site make it a great place to collaborate on and search for ideas to use in the classroom. Teachers can also have separate sites as well to share their ideas to educators beyond their own school.

No, Posterous isn't perfect, but it certainly works much better than most of the tools out there, even those you have to purchase. As education moves more and more online, sites such as Posterous could play a valuable role for smaller institutions that can't afford a large scale integrated IT operations.

Have you used Posterous in the classroom? What has been your experience? Do you have anything to add?


About the Guest Blogger
Nathan Hall is an ESL instructor with Global Village Calgary in Alberta, Canada. He will be completing his MA TESOL at Trinity Western University in April 2012. He has taught in five countries, including 4 years in Klaipeda, Lithuania as an English in the workplace instructor. He is an advocate for using technology in the classroom and has given various PD sessions on the topic. He can be found online on his blog, nathanhall.ca and on Twitter, @nathanghall

Wednesday, February 22, 2012

Web 2.0 Collaborative Projects in the Middle School

I am the library media specialist for my school and part of my job is to assist my faculty with the integration of technology in the curriculum. As such, I am always searching for new ideas to use in collaborating with my classroom teachers. Showcased below are a few of the Web 2.0 tools I have used with classes along with details of specific projects I have helped students to produce.


Cacoo is a free online diagraming tool which allows real-time collaboration. Teachers can sign up for a free Academic Plan which allows them to add student users. *Please note the Academic Plan is free through June 30, 2012 after which it will be half the price of the Team Plan.

The Project:
After studying Georgia's barrier islands for the term, students used Cacoo to create a food web of native plants and animals. The class was divided into groups of four students. All four students in each group had individual Cacoo accounts and were required to work collaboratively via Cacoo to design one food web. As an added challenge, group members were not allowed to talk about the project but were required to “chat” online within their Cacoo accounts instead.


My Observations:
Teaching the kids how to use the program took half a class period as students caught on very quickly. We had a few problems with students returning permission forms, forgetting passwords, and one group not working well together. Since group activities and the guidelines for group work were very familiar to students, group problems were quickly resolved. I found no technology problems with Cacoo at all and will use the tool with future projects. I do wish they would reconsider the upcoming price increase for the Academic Plan.

Weebly is a free site which allows users to create websites and blogs using widgets. Weebly for Education enables teacher users to create free accounts for students to build their own websites.

The Project:
After studying all year about New York City, our 8th grade gifted groups take a five-day guided bus tour to the Big Apple. Upon their return, students create websites about their trip and are required to use their own digital images. Requirements include at least four categorized pages on the site and a minimum of 10 articles about New York City.

My Observations:
Teaching classes to use Weebly took one class period and required mini-sessions during the week-long project for some reteaching of the multimedia and blog sidebar items. Good web design techniques(compared to bad) as well as using complementary color schemes were also a part of the lesson. Since students had been studying the topic all year, they already had a vision for the content. As soon as I completed instruction, kids quickly got to work on their designs. Weebly was a very simple tool for their websites and I would use with students again.

Photo Story 3 is a free software download from Microsoft which enables users to create slideshows using your own digital pictures. The program allows you to edit photos, include text, add motion, insert narration, and create your own soundtrack. Please note the program is  Windows-based and is not available for Mac.

The Project:
Students created book trailers on their favorite fiction book to share. Similar to movie trailers, a book trailer is a video advertisement for a book produced to encourage viewers to read it.

My Observations:
I always start with a project introduction a week before we begin working with Photo Story 3. To grab their attention, I show several examples of trailers and talk about persuasive advertising techniques. Students work on storyboarding for the next week in the classroom to graphically organize their thoughts. Once they come back to the media center, teaching how to use Photo Story 3 takes one full class period before they can begin creating their book trailers. More details including examples, a rubric, and a project timeline can found on my book trailer post.

One of my 8th graders chose to create his book trailer on Peak by Roland Smith.


Fotoflexer is a free online image editor which allows you to perform basic editing options as well as some advanced features. You can create an account to save a project you are currently working on to login later to complete.  


The Project:
Students must select an online image to edit and employ techniques taught during the Fotoflexer Media Literacy lesson.


My Observations:
Most of my students have no idea how much editing is done to photos. I start my lesson by showing some before and after celebrity photos. We discuss that our perceptions of a normal body image are impacted negatively by these examples. 


I also show classes how edited photos are used to manipulate the way we think. After our class discussion, I show students how the pros edit photos. 


I use Fotoflexer because it is very simple to use but it also has some advanced features under the “Geek” tab. My favorite tool is the Smart Scissors which allows you to cut out a portion of an image for placement in another. The kid’s favorite is the distort tab which allows a plus-sized model to lose 30 pounds with one mouse click.


About the Guest Blogger:
Denise Borck has been teaching for 20 years at the middle level, the last twelve years of which have been spent in the library media center. She loves being able to share her love of reading with her students as well as her interest in technology. Denise has been selected as the 2012 Teacher of the Year for her school and the 2010 Media Specialist of the Year for the Coastal Region District of Georgia. You can follow her at http://dborck.wordpress.com or at http://wjms.bulloch.k12.ga.us/media_center_home.

Guest Post - Look at the Camera and say "Think"

I think back on my own days in elementary and even high school and am disappointed by how little I actually remember, despite the fact i probably spent 75% of my time there from ages 5-18.  How could I have spent so much time in a place that I really did enjoy and feel successful but still have relatively little memory? Now, one of my top goals as a teacher is to make what happens in the classroom everyday a memorable learning experience.

No denying, drill and kill will most likely embed a skill into someones’ brain. It's how I learned most of my elementary math and spelling skills, for sure. My daughter, who really has the natural desire to get better at basketball, will shoot baskets outside for an hour everyday and I see her improving. The more we review what we want to learn, the more permanent it becomes in our brain and the more likely we are to find an opportunity to connect it to some other fact we know.  That is when the fact becomes part of our working knowledge.  “Drill and kill” really means reflecting, repeating and meta cognition.


Ok, great. I really want all that in my classroom but how do I get that without drill and kill?!  Here's my secret, I trick my students into reflecting.  


My students get excited to see and hear themselves, so I've made my camera my most essential piece of technology in my room. We take lots of pictures and video in class but I don't put it away for just an "end of year" wrap up. I use it daily and, suddenly, my students are eagerly wanting to examine these images, individually and as a class. They watch their own student produced videos for homework. They proudly watch it with their parents, maybe even siblings or grandparents. They start talking about what they’ve made and watched in their social interactions. (I’ve overheard the conversations!) Without even realizing, they've revisited their learning multiple times!


I use tools like Voicethread, fotobabble or Qwips to have the students do their own narration and captions, describing their thinking captured in the picture. Homework has changed from "answer the reflection questions 1-5, on pg 54" to "Narrate what was happening and what you were thinking about in these 5 pictures of you in class today."

I give opportunities with photoblogs made on Posterous to pose questions and comment on what's happening in the pictures of their peers. Class discussion goes deeper and the participation level skyrockets. The students who hesitate to raise their hand now have the opportunity to contribute.


It is almost too easy to use iMovie to create green screen movies.  They're honestly magical productions that let my students observe themselves being transported out of their everyday classroom  into ANY of the environments they're studying, without actually leaving the classroom.  It's like that great book series, The Magic Schoolbus, actually taking place within our four walls.

If you want to trick your students into reflecting too, you need a camera. Keep it on your desk. Never put it away. Teach your students how to use it, if they don't already know. Take pictures. Let the students take pictures. Take video. Carry it around as you collaborate with student groups. Document their learning. Make it personal. Capture their expression, their mood, their interactions. Then post it, create slide shows, albums, , montages, collages, scrapbooks, newsletters, YouTube channels, a website- whatever it takes! These are the annals of our learning, what ever form they take. All these images  we compile turn into "texts" that are so much more meaningful and memorable than the same old textbooks we pass out at the start of the year and then collect at the end to put back on the shelf, and wait, unchanged, for next years' class.


If a classroom is a place where it doesn't seem like a lot of pictures should be taken , then it makes me think memories are not being made. As a society, we treasure our photos of our most valued memories. We capture the important moments like birthdays, weddings, vacations, etc. gather them together to tell the story, keep them somewhere safe, and go back again and again to remind ourselves of that time. We owe it to our students to make their time in the classroom an event they want to capture, remember and revisit over and over again.


About the Guest Blogger
Alison Anderson is a proud Marquette University graduate and spent her teacher training years in the public and private schools of Milwaukee, WI. Since moving to Portland, OR to start her family, she has experienced different schools and  philosophies of education, like Reggie Emilia and Montessori as well as being involved in the more traditional forms. 


Someone once asked me who “Ted Rosececi” is, but, really, my twitter handle is @tedrosececi because my most important job is mothering 3 not-so-small children, Ted (14), Rose (12) and Cecilia -aka Ceci (9). After doing that full time for quite awhile, I have fought my way back to the teaching realm where I spend my day with the coolest bunch of 5th graders I've ever met. Together, we are bringing tech into the classroom and are each others' biggest supporters.

Guest Post - Using Microsoft Word to Create better Word Walls

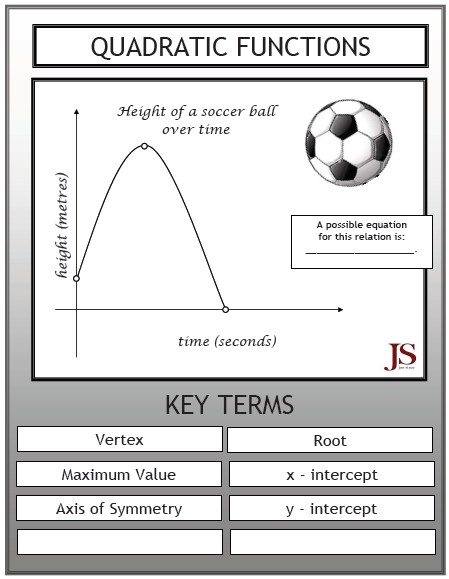
Word Walls are an effective strategy for building vocabulary with students, especially for subject-specific terms. These lists are usually posted on classroom walls and sometimes have a definition attached to them. A more interactive word wall that includes images requires students to be more active learners as they attach meaning to each of the words in the list. Teachers may post these in the classroom after first using them as teaching tools when introducing a concept. They may continue to refer to them as students make deeper connections. Another good option is to use an interactive whiteboard, allowing students to place words in the correct place in the diagrams. As a pedagogical tool, an interactive word wall requires students to attach meaning to the words and build their own definitions. Because there is no definition attached to any of the terms, there will be no reason to hide these when there is a quiz or test.  


Creating these more interactive word walls is easily accomplished by making us of some of the image tools in Microsoft Word. There are 19 mathematics images ready to print as posters and a template that you may use to create your own. You may download the .pdf and just print the posters for your classroom, or use the Microsoft Word file and edit what is here, or create more of your own.

You may also want to use the Mathematics Tool Kit for Teachers … it will make your job a lot easier when you are creating those beautiful mathematics documents. 


About the Guest Blogger
Joe Sisco has taught Secondary Mathematics for 25 years in the Windsor-Essex Catholic District School Board. He is currently the e-Learning Contact, coordinating e-Learning, Blended Learning, Homework Help, and distribution of tech resources for teachers in our Board.
joe_sisco@wecdsb.on.ca
BLOG - http://wecdsbit.blogspot.com/
Website - https://sites.google.com/a/wecdsb.on.ca/math-matters/

Tuesday, February 21, 2012

Interpreting Political Cartoons - Guest Post

The inspiration for this lesson came from an article by John Bickford discussing how political cartoons can and should be used in the classroom. The article is copyrighted but I have recieved permission from Social Studies Research and Practice to share the article with freetech4teachers. If you would like to view more articles from their online peer reviewed journal click here.

In an effort to encourage class discussion I had my students watch pre-selected video clips of the GOP debates. This assignment can be done just as well by using primary source documents.

Then they create their own political cartoons on Toondoo (others will work but I like toondoo the best). Using a computer program or website works better than allowing the students to free hand the assignment. The point of the assignment is to draw meaning and historical significance from the videos or documents not draw lines an characters.

Depending on your students ability this assignment will take a week or even two to complete.  The cartoons should be well thought out and well presented. Then when the students are finished they will present.

In every piece of art two messages exist. An intended message and a conveyed or received message. This idea is at work in this lesson. 


The students who created cartoons will present the cartoons to the class but will not be able to share their intended message until prompted by the teacher.

Meanwhile the remainder of the class is discussing the conveyed message. It becomes particularly interesting to see how the two perspectives make up the whole message.

Student engagement is always essential to an effective lesson. I have rarely achieved the same level of student engagement in class discussion. I believe it has something to do with the fact that they created the content in which we are discussing.


My big points that I attempt to get across to my class throughout this process are as follows:
  • Why a political cartoon is different from a comic strip
  • How to find the message of a cartoon (imagery, symbolism, sarcasm etc.)
  • Perspective
Perspective is the big one. I want my students to try to figure out the creators perspective and what they are trying to accomplish by the cartoon. If they can successfully learn this it will help them understand professional cartoonist.

If you are feeling like a super overachiever you may see if you can contact a political cartoonist from a local newspaper to come in as a follow up activity a week or two after the lesson.


About the Guest Blogger
My name is Marcus Byrd and I write at TeacherAde. I have only been blogging for about 4 months but have really enjoyed the experience of learning from and connecting to other educators. I am studying at the University of West Georgia while I work in the Paulding County School District. I am always interested in building a larger network of teachers and collaborators.

My teaching career began as a paraprofessional or teachers aid. After two years of working alongside the teacher I realized how much that teachers are responsible for. My attitude from early on became that I like to help teachers teach. So I began the blog to do that on a larger scale and have been thrilled about where it has taken me in 4 months. I am even more excited about where it will take me in the future. If you know something that will help teachers teach then by all means share it!

Monday, February 20, 2012

Making Cell Phones Work for Good With Poll Everywhere - Guest Post

Polleverywhere.com has become one of my favorite classroom tools.  It’s free, and easy to use.  All you need is a computer, a data projector, and decent cell phone service in your classroom.  After fighting a daily battle with students to put their phones away, I decided to take away the power of their phones as a distraction by using them for educational purposes.  Here’s how I’ve made cell phones work for me with the help of polleverywhere.com.

Establish Clear Boundaries and Rules

I introduce polleverywhere.com to students by first doing a quick low tech survey (by asking the students to raise their hands – you can do this seven-up style where students put their heads down so it’s anonymous) to see which students have a cell, and out of those students which ones have a plan that allows them unlimited text messaging.  If more than half the class has met these qualifications I will proceed and allow students to partner with a peer who has a cell phone if they do not.  I will then go over rules and expectations for participating – cell phones may be out and visible during the polling, but once we are done with the polling I will announce that cell phones need to be put away, and within 30 seconds I should no longer see a phone.  If I have issues with phone usage we will not use cell phone polling in class for a week (or an established period of time).  Since students enjoy this activity I haven’t experienced difficulty with them following the rules.

I only use the multiple choice option for polls.  There is an open response option where students could type out a response that would appear on the screen.  Since this option is anonymous a student could conceivably write whatever they want, and it could appear in front of the entire class.  I prefer not to take this risk and stick with multiple choice options only.

The number students text their response to is linked to your account (but in no way linked to your actual cell phone number).  Students can store this number in their cell as one of their contacts so they don’t need to type it in every time they want to participate in a poll.

Predictions and Opinions

Polls are a great way to get students excited about the new unit, to begin thinking about the material, make predictions, and share their opinions.  Allowing them to respond anonymously leads to more students participating, instead of the usual three hands that will always go up.  Seeing the responses come in can lead to a great discussion as well.  This can also be used to check-in on students’ prior knowledge on a subject.  I recently used a poll to ask students what qualities they thought made a good leader prior to begin my dictators unit, this led to an excellent discussion on historical leaders, politicians in general, and the Republican primaries.


Do – Nows and Exit Tickets

Polls are a great way to have students engaged from the minute they walk in the door.  You can have a poll projected up on the board for students to respond to instantly, or you can just write the information (question, response options and numbers) up on the board if you need to use the computer for attendance, or want to wait until later to reveal the responses.  Polls also can serve as an excellent exit ticket to keep students active until the bell rings or to fill in those last couple minutes when there’s not enough time to start a new activity.  At the beginning of the week I always create a few extra polls that I can turn use to keep students engaged and focused.

Review and Feedback

I frequently use polls to review for tests (this can easily be turned into a competition between class periods too).  While this review is good for the students, it’s also good for me to see weaknesses in content knowledge, and catch it before we move onto the new unit.  This information allows me the opportunity to re-teach anything students may have missed or review information they’re unclear on.  Students also have an opportunity to see where their weaknesses are.  When I ask my students if they have any questions or need to go over any material again I get blank stares and shrugs.  Conducting polls makes gaps in knowledge apparent to both the teacher and the students.  I know what I need to cover in more detail, and they know what they need to study to prepare for the test.


About the Guest Blogger
Lisa Herzl teaches freshmen world history at a public school in Massachusetts.  You can find her on her class wiki http://msherzlworldhistory.wikispaces.com, on twitter @lisa_herzl, and blogging at http://knitteachride.blogspot.com.

Live Blogging the Wizard of Oz

Movies are wonderful resources in education, but they are usually associated with passive learning. To keep students (grades 9-12) active and engaged during movies, we have used a free live-blogging software program called G-snap.

G-snap is a free website that allows anyone to set up a live blogging event; access to the event can be posted by a link or directly embedded on a webpage. There is no registration required, comments can be saved, and the event can run for several days. During the event, questions can be posted and most importantly, participant responses can be moderated before they are shared publicly.
The most recent success was with MGM’s classic The Wizard of Oz which was used as an introduction to a 9th grade unit centered on the universal elements of stories. The students at Wamogo High School in Northwest Connecticut are fortunate enough to have the use of net books in class or they may bring their own digital device in order to access the materials used in class. Students were engaged in the film from the opening soundtrack; several students joined Dorothy in singing Somewhere Over the Rainbow.  When Almeria Gulch appeared to take Toto away in her bicycle basket, and despite my best efforts to keep everyone quiet, the comments began:
“I was so scared of her on her bike!”
“I can’t watch her change into the witch…I just can’t watch!”
The tornado scene that followed kept them speechless. When the house landed, there was an audible “oh!” from Dorothy. Students flinched as well; they had arrived in OZ.
The lesson’s objective was to have students identify a character’s weaknesses or strengths. We wanted students to recognize the qualities that a character thinks he or she lacks is exactly the unrecognized quality the character possesses. Of course, Frank Baum’s story is all about motivation and character qualities.


Using the G-snap software, I posed a series of questions at critical moments in the film
What motivates Glinda to place the ruby slippers on Dorothy’s feet? Is this in Dorothy’s best interest?
What happens when one strays off the path of The Yellow Brick Road?
What qualities does the Scarecrow exhibit? How is this connected to his motivation?
I also wanted them also to reflect on the motivations of the Wicked Witch of the West and the intensity of her dialogue.  For example: “those slippers will never come off . . . as long as you're alive!” or “The last to go will see the first three go before her.”
I posted:  Is this film appropriate for children? Is the film too scary?
Their responses were mixed.  Many felt the film was fine for children, but some students  considered that the dialogue was really much more frightening then they had remembered:
"I think I was about 5 years old and I remember hiding under a blanket when the flying monkeys came on TV."
“There are many violent movies that children shouldn’t see but this movie is classic."
"I saw this film when I was a little kid, and I was frightened for days, I had nightmares about this horrible witch, so I think it might be a little extreme for little kids."
"I saw it when was like 4 and no its not that bad, they will get over it. It’s not like a death threat, well it kinda is but never mind. I don't think it’s that bad."
The use of live blogging allowed students to stay focused character motivation in the film.  Their responses included:
“The Tinman does have a heart. He is the most ‘emo’ character of them all!”
“Scarecrow has a brain and when Dorothy says she will miss him the most she means being smart is what people should look for in friends.”
“The companions represent different things: Lion-Courage, Tin Man-Heart/Love. So it shows that even though you don't think you have it you still do because the Lion still stood up for himself. And Tin Man loved his friends, so they just thought they did not have them when they really did."
The power of live blogging with G-snap made watching the The Wizard of Oz an active and engaging lesson, and character motivation is only one of the lessons that can be learned. We have since used the software to live blog the film Gallipoli as comparison to the message in All Quiet on the Western Front, and I have posted questions about dramatic irony during the film Othello. At every grade level, students enjoyed live-blogging and reading each other’s comments.
G-snap removes the stigma of passive learning from movies and allows students the opportunity to “talk” during the movie without hearing a teacher “shhhhh!”


About the Guest Blogger
Colette Marie Bennett is the English and Social Studies Department Chair at Wamogo High School, a combined college prep and vocational agriculture school (Regional School District #6) in the Northwest corner of Connecticut.  Bennett has 20 years of experience teaching in parochial and public school systems from grades 6-12. She has presented how technology is incorporated in her English classroom at the Connecticut Educators Computer Association Conference (2010), the National Council of Teachers Annual Conference (2010), and the Advanced Placement Annual Conference (2011). She blogs about how she has increased her classroom libraries and what she does with these used books at http://usedbookclassroom.wordpress.com/  She tweets at Twitter@Teachcmb56

Tuesday, February 7, 2012

You're Invited! Do You Want to Write a Guest Post?

Update: I have taken down the submission form as I had more than 50 submissions in 13 hours. My apologies if you were not able to get your submission in. Those of you who put your submissions in will hear from me in the next 24 hours. 

At some point in each of the last three years I've opened up some time for guest bloggers to contribute to Free Technology for Teachers. Last year that time was in April. The two previous years that time was in February. This year I'm going to open up some days around President's Day (U.S. Holiday) for guest bloggers. February 20 (Monday) through 24 (Friday) will be "guest blogger week." (Yes, I realize it's not quite a week). My goal is to feature three guest bloggers each day of the week while Morrison (my dog in the picture) and I are on an ice fishing vacation.

If you would like to be a guest blogger on Free Technology for Teachers during the week of February 20-24 here are the details on what I'm looking for.

1. I'm looking for people who have not written guest posts for me before. I want to give new people a chance to have their voices heard. 
2. I'm looking for people who are willing to share examples of how they have used technology in their schools as a teacher, teacher-librarian, media specialist, or administrator. 
3. I'm not looking for list style posts like this one, I've got that covered. 
4. If you're a paid representative of a company, thank you for your interest, but this is not an opportunity for you to promote your product or service. Click here if advertising is what you're after. 
5. People who can heed this advice from Darren Rowse about guest blogging. 

What you can get out of this:
1. Exposure to an audience of more than 43,000 subscribers. Past guest bloggers have reported seeing significant upturns in visits to their blogs and or Twitter profiles after guest posting here. Even if you're just starting to blog or be active in social media, please don't let that discourage you.
2. My undying gratitude. 
3. If we meet up at a conference like EdCamp Boston or ISTE, I'll buy you the beverage of your choice. 

If you've read all of the above information and are interested in guest posting, please complete the form below. I will close this form once I have filled all of the guest posting slots. If the form is up, I'm still accepting submissions.

Update: I have taken the form down as I had more than 50 submissions in 13 hours. My apologies if you were not able to get your submission in. Those of you who put your submissions in will hear from me in the next 24 hours.