Showing posts with label guest posts. Show all posts

Monday, February 27, 2012

How Twitter Helps Overcome Inequity With Rural Internet Access

Last week was guest post week here, but I messed up on the scheduling of one post by Tanis Thiessen. Therefore, I'm starting the week with one last guest post.


While it seems like “all the world” is accessing the internet freely and quickly these days, the truth is that there are still areas in Canada where high speed internet is unavailable. In our rural K-12 school in southern Manitoba, approximately 20% of our community has access to the internet only through dial-up, with the rest having access through high-speed connections. So how can we communicate in a timely fashion, using technology to reach ALL of our community, when dial-up is an obstacle? The answer--tweet!

Set up your school with a twitter account, and all your stakeholders--parents, students, board members, the community--can easily get up-to-date information on their handheld devices. We regularly use our Twitter account to send out calendar updates, school assembly information, articles on current topics in education, and “what’s happening in class now” pictures.

           Sports events, dramas, concerts, in-class projects, new equipment, guest speakers, monthly themes are all highlighted. Through short tweets and quick pix, community members stay connected to the pulse of the school.


We try to make our account easy to find, adding a “Follow Us On Twitter” button to our wiki page (http://thecreek.pbworks.com). This is an easy way to guide people to our Twitter account, and bonus is that these buttons are free from many sources on the ‘net. (Ours came from Twitter Buttons, http://www.twitterbuttons.com).

Realizing that Twitter limits our interactions by the brevity of the posts, we try to make our communications with the community as multi-faceted as possible. We send email attachments of our newsletter and monthly calendar to parents who request it, while posting it on our wiki makes it accessible to those who prefer that venue. Teachers use Edmodo, Moodle, Google Docs, and the school’s wiki to provide various methods for students to stay up-to-date on classwork and utilize their tech skills to meet educational outcomes.

Twitter is a great way to keep stakeholders informed of your school activities. Parents appreciate the calendar updates; students appreciate the pictures and links to cool websites; businesses supporting our students through apprenticeship appreciate the free advertising given through mentions in tweets throughout the year. In an area where dial-up could prevent timely communication, Twitter helps overcome this rural inequity.

Elm Creek School, part of Prairie Rose School Division in south-central Manitoba, is a K-12 school of approximately 200 students and 16 teachers. Our building is nestled in the small but robust community of Elm Creek, 40 kilometres southwest of Winnipeg, capital of Manitoba. Our school provides a wide variety of programming for students, utilizing interactive TV connections for some classes, online coursework for others, technical-vocational opportunities through Carman Collegiate just 15 minutes south of us, and in-house teacher-led coursework. We have three Smartboards, 1:3 computer-to-student ratio, a high school science lab with university-grade equipment, two computer labs, a gymnasium with mezzanine for weight training, and a canteen that serves homemade lunch specials daily.

Elm Creek School has a thriving daycare and preschool program run by a community group that uses our building, and we offer some adult coursework in the evenings. We have an elementary music program, a high school band and choir program, technology courses, career and technology studies with apprenticeships available through community partnerships, and an incredibly supportive Parent Advisory Council that has upgraded our outdoor play spaces and will soon be upgrading one of our two computer labs in the building.

About the Guest Blogger
Tanis Thiessen is a school administrator in Elm Creek, Manitoba. You can follow the Elm Creek School Twitter feed here

Wednesday, February 22, 2012

Web 2.0 Collaborative Projects in the Middle School

I am the library media specialist for my school and part of my job is to assist my faculty with the integration of technology in the curriculum. As such, I am always searching for new ideas to use in collaborating with my classroom teachers. Showcased below are a few of the Web 2.0 tools I have used with classes along with details of specific projects I have helped students to produce.


Cacoo is a free online diagraming tool which allows real-time collaboration. Teachers can sign up for a free Academic Plan which allows them to add student users. *Please note the Academic Plan is free through June 30, 2012 after which it will be half the price of the Team Plan.

The Project:
After studying Georgia's barrier islands for the term, students used Cacoo to create a food web of native plants and animals. The class was divided into groups of four students. All four students in each group had individual Cacoo accounts and were required to work collaboratively via Cacoo to design one food web. As an added challenge, group members were not allowed to talk about the project but were required to “chat” online within their Cacoo accounts instead.


My Observations:
Teaching the kids how to use the program took half a class period as students caught on very quickly. We had a few problems with students returning permission forms, forgetting passwords, and one group not working well together. Since group activities and the guidelines for group work were very familiar to students, group problems were quickly resolved. I found no technology problems with Cacoo at all and will use the tool with future projects. I do wish they would reconsider the upcoming price increase for the Academic Plan.

Weebly is a free site which allows users to create websites and blogs using widgets. Weebly for Education enables teacher users to create free accounts for students to build their own websites.

The Project:
After studying all year about New York City, our 8th grade gifted groups take a five-day guided bus tour to the Big Apple. Upon their return, students create websites about their trip and are required to use their own digital images. Requirements include at least four categorized pages on the site and a minimum of 10 articles about New York City.

My Observations:
Teaching classes to use Weebly took one class period and required mini-sessions during the week-long project for some reteaching of the multimedia and blog sidebar items. Good web design techniques(compared to bad) as well as using complementary color schemes were also a part of the lesson. Since students had been studying the topic all year, they already had a vision for the content. As soon as I completed instruction, kids quickly got to work on their designs. Weebly was a very simple tool for their websites and I would use with students again.

Photo Story 3 is a free software download from Microsoft which enables users to create slideshows using your own digital pictures. The program allows you to edit photos, include text, add motion, insert narration, and create your own soundtrack. Please note the program is  Windows-based and is not available for Mac.

The Project:
Students created book trailers on their favorite fiction book to share. Similar to movie trailers, a book trailer is a video advertisement for a book produced to encourage viewers to read it.

My Observations:
I always start with a project introduction a week before we begin working with Photo Story 3. To grab their attention, I show several examples of trailers and talk about persuasive advertising techniques. Students work on storyboarding for the next week in the classroom to graphically organize their thoughts. Once they come back to the media center, teaching how to use Photo Story 3 takes one full class period before they can begin creating their book trailers. More details including examples, a rubric, and a project timeline can found on my book trailer post.

One of my 8th graders chose to create his book trailer on Peak by Roland Smith.


Fotoflexer is a free online image editor which allows you to perform basic editing options as well as some advanced features. You can create an account to save a project you are currently working on to login later to complete.  


The Project:
Students must select an online image to edit and employ techniques taught during the Fotoflexer Media Literacy lesson.


My Observations:
Most of my students have no idea how much editing is done to photos. I start my lesson by showing some before and after celebrity photos. We discuss that our perceptions of a normal body image are impacted negatively by these examples. 


I also show classes how edited photos are used to manipulate the way we think. After our class discussion, I show students how the pros edit photos. 


I use Fotoflexer because it is very simple to use but it also has some advanced features under the “Geek” tab. My favorite tool is the Smart Scissors which allows you to cut out a portion of an image for placement in another. The kid’s favorite is the distort tab which allows a plus-sized model to lose 30 pounds with one mouse click.


About the Guest Blogger:
Denise Borck has been teaching for 20 years at the middle level, the last twelve years of which have been spent in the library media center. She loves being able to share her love of reading with her students as well as her interest in technology. Denise has been selected as the 2012 Teacher of the Year for her school and the 2010 Media Specialist of the Year for the Coastal Region District of Georgia. You can follow her at http://dborck.wordpress.com or at http://wjms.bulloch.k12.ga.us/media_center_home.

Guest Post - Look at the Camera and say "Think"

I think back on my own days in elementary and even high school and am disappointed by how little I actually remember, despite the fact i probably spent 75% of my time there from ages 5-18.  How could I have spent so much time in a place that I really did enjoy and feel successful but still have relatively little memory? Now, one of my top goals as a teacher is to make what happens in the classroom everyday a memorable learning experience.

No denying, drill and kill will most likely embed a skill into someones’ brain. It's how I learned most of my elementary math and spelling skills, for sure. My daughter, who really has the natural desire to get better at basketball, will shoot baskets outside for an hour everyday and I see her improving. The more we review what we want to learn, the more permanent it becomes in our brain and the more likely we are to find an opportunity to connect it to some other fact we know.  That is when the fact becomes part of our working knowledge.  “Drill and kill” really means reflecting, repeating and meta cognition.


Ok, great. I really want all that in my classroom but how do I get that without drill and kill?!  Here's my secret, I trick my students into reflecting.  


My students get excited to see and hear themselves, so I've made my camera my most essential piece of technology in my room. We take lots of pictures and video in class but I don't put it away for just an "end of year" wrap up. I use it daily and, suddenly, my students are eagerly wanting to examine these images, individually and as a class. They watch their own student produced videos for homework. They proudly watch it with their parents, maybe even siblings or grandparents. They start talking about what they’ve made and watched in their social interactions. (I’ve overheard the conversations!) Without even realizing, they've revisited their learning multiple times!


I use tools like Voicethread, fotobabble or Qwips to have the students do their own narration and captions, describing their thinking captured in the picture. Homework has changed from "answer the reflection questions 1-5, on pg 54" to "Narrate what was happening and what you were thinking about in these 5 pictures of you in class today."

I give opportunities with photoblogs made on Posterous to pose questions and comment on what's happening in the pictures of their peers. Class discussion goes deeper and the participation level skyrockets. The students who hesitate to raise their hand now have the opportunity to contribute.


It is almost too easy to use iMovie to create green screen movies.  They're honestly magical productions that let my students observe themselves being transported out of their everyday classroom  into ANY of the environments they're studying, without actually leaving the classroom.  It's like that great book series, The Magic Schoolbus, actually taking place within our four walls.

If you want to trick your students into reflecting too, you need a camera. Keep it on your desk. Never put it away. Teach your students how to use it, if they don't already know. Take pictures. Let the students take pictures. Take video. Carry it around as you collaborate with student groups. Document their learning. Make it personal. Capture their expression, their mood, their interactions. Then post it, create slide shows, albums, , montages, collages, scrapbooks, newsletters, YouTube channels, a website- whatever it takes! These are the annals of our learning, what ever form they take. All these images  we compile turn into "texts" that are so much more meaningful and memorable than the same old textbooks we pass out at the start of the year and then collect at the end to put back on the shelf, and wait, unchanged, for next years' class.


If a classroom is a place where it doesn't seem like a lot of pictures should be taken , then it makes me think memories are not being made. As a society, we treasure our photos of our most valued memories. We capture the important moments like birthdays, weddings, vacations, etc. gather them together to tell the story, keep them somewhere safe, and go back again and again to remind ourselves of that time. We owe it to our students to make their time in the classroom an event they want to capture, remember and revisit over and over again.


About the Guest Blogger
Alison Anderson is a proud Marquette University graduate and spent her teacher training years in the public and private schools of Milwaukee, WI. Since moving to Portland, OR to start her family, she has experienced different schools and  philosophies of education, like Reggie Emilia and Montessori as well as being involved in the more traditional forms. 


Someone once asked me who “Ted Rosececi” is, but, really, my twitter handle is @tedrosececi because my most important job is mothering 3 not-so-small children, Ted (14), Rose (12) and Cecilia -aka Ceci (9). After doing that full time for quite awhile, I have fought my way back to the teaching realm where I spend my day with the coolest bunch of 5th graders I've ever met. Together, we are bringing tech into the classroom and are each others' biggest supporters.

Guest Post - Using Microsoft Word to Create better Word Walls

Word Walls are an effective strategy for building vocabulary with students, especially for subject-specific terms. These lists are usually posted on classroom walls and sometimes have a definition attached to them. A more interactive word wall that includes images requires students to be more active learners as they attach meaning to each of the words in the list. Teachers may post these in the classroom after first using them as teaching tools when introducing a concept. They may continue to refer to them as students make deeper connections. Another good option is to use an interactive whiteboard, allowing students to place words in the correct place in the diagrams. As a pedagogical tool, an interactive word wall requires students to attach meaning to the words and build their own definitions. Because there is no definition attached to any of the terms, there will be no reason to hide these when there is a quiz or test.  


Creating these more interactive word walls is easily accomplished by making us of some of the image tools in Microsoft Word. There are 19 mathematics images ready to print as posters and a template that you may use to create your own. You may download the .pdf and just print the posters for your classroom, or use the Microsoft Word file and edit what is here, or create more of your own.

You may also want to use the Mathematics Tool Kit for Teachers … it will make your job a lot easier when you are creating those beautiful mathematics documents. 


About the Guest Blogger
Joe Sisco has taught Secondary Mathematics for 25 years in the Windsor-Essex Catholic District School Board. He is currently the e-Learning Contact, coordinating e-Learning, Blended Learning, Homework Help, and distribution of tech resources for teachers in our Board.
joe_sisco@wecdsb.on.ca
BLOG - http://wecdsbit.blogspot.com/
Website - https://sites.google.com/a/wecdsb.on.ca/math-matters/

Interactive Bulletin Boards - Guest Post

As my students have transitioned more and more into creating digital projects over the last few years, I have struggled with ways to showcase their work in a community that does not always possess the tools to access the World Wide Web. Lately, I’ve been playing with the idea of bringing together the digital and “real” worlds in their projects. My students yearn for outside feedback, but rarely get it when they post their work on a blog or in an Internet gallery. Thus, after reading a post about Transliteracy, my Interactive Bulletin Board was born.


Using a project from Read Write Think about Parallel Poems and an art project from Princeton Online, the students had a beautiful 2-D Bulletin Board to display in our hallway.  But, I wanted to bring its viewers into the digital world as well, so I used a few tricks to engage the audience - QR codes, a puzzle, and an iPad.

First, I mixed up the artwork and poetry on the board so that they weren’t matched with each other.  Then I placed QR codes on the artwork that led the reader to an audio file in which the artist/poet read his or her poem.  I also placed QR codes that led the reader to Google Forms online that allowed the viewer to vote on their favorite pieces of art and poetry. This was a hit with my own students, but I wanted to widen the audience, so I then sent out e-mails to surrounding classrooms offering the loan of some of our classroom iPads so that their students could experience the bulletin board, too.

The teachers who volunteered to participate were not very familiar with either iPads or QR codes, but they thought their students would enjoy the opportunity.  With a few instructions, the students themselves (third grade) were able to tutor each other as small groups strolled over to our hallway to view the board. For almost a week, there were students standing in front of our board with iPads, discussing the art and poetry, trying to match them up, and giving their input on the work.  It was the most feedback we have ever gotten on student work - virtual or otherwise.

The success of this “pilot” has definitely made me want to branch out to other ideas - codes linked to videos or blog posts so viewers can comment, a bulletin board in the library to reach an even wider audience, etc... 

Students find QR codes engaging.  Sure, the novelty will wear off in a few years, but we can certainly take advantage of it now to enhance learning.  For a few more ideas on how you can use QR codes in the classroom in novel ways, such as for classroom coupons, check out my blog at http://engagetheirminds.com, and do a search for QR codes, or you can just click here. 

About the Blogger
Terri Eichholz is a teacher of Gifted and Talented students in North East Independent School District in San Antonio, TX.  This is her 21st year of teaching and learning from her students.  You can find her blog, Engage Their Minds:  Different Ideas for Different Thinkers, at http://engagetheirminds.com

Tuesday, February 21, 2012

Using Show Me to Create Lessons on iPads - Guest Post

As the technology integration teacher for Seymour Public Schools in Seymour, CT, I get to spend a lot of time exploring new tools which make teaching and learning more engaging and ultimately more successful for students. Earlier this year, I discovered one of these tools called Show Me, which is an online learning community for students of all ages.  My initial thought was that it was just another Khan Academy.  The difference, I quickly discovered, was that on Show Me you can also create your own lessons...not just watch.  This makes Show Me a very powerful educational tool.


As a student looking to learn about a particular topic you can search Show Me by topic and subject.  As a teacher, you can create your own videos or assign one from the community for students to view.  If you would rather share your knowledge with your class (or the world) a la Khan Academy, you will need to download the free iOS app.  Currently there is not an app available for Android device but Show Me has plans to develop one in the future.  Once you have created something on Show Me you can share it with the world or keep it personal.  Sharing is made easy with one click posting to Facebook and Twitter as well as through the use of the embed code for websites.


Moving forward, Show Me seems to be in the initial stages of building a database of SAT preparation videos.  This would be a tremendous resource for high school students and also can be used as an exemplar for how to create an effective tutorial on Show Me.  On the website there is also a link to their blog called the Show Me Voice which has some great information for teachers looking to integrate Show Me into their classroom.  I found a “How To” section and some featured videos from the public community to be very useful.


Using Show Me, teachers and students have the ability to both teach and learn from the community of videos.  Used as a student directed activity, Show Me empowers students to think about a topic and how it should be presented.  As educators, we know that the highest level of understanding is achieved when a student knows the material well enough to teach it.  Show me give students that opportunity through the use of technology.  Below is an example of a simple lesson on the parts of the tuba created by a Seymour High School student in @Brandt Schneider’s class:


Now What?
If you have some iPads in your classroom it’s time to get recording!  Use Show Me to assess your students rather than using a paper and pencil.  Creating an account on Show Me is free and will have you up and running in seconds.  A tip for beginners is to use a stylus with the iPad to have more control over your drawing.  Also, In order to create more advanced videos you can pause your recording and then clear the canvas which will simulate a multi-page file.  Have fun!

About the Guest Blogger
Mike Oberdick is a Technology Integration Teacher for Grades 6-12 in Seymour, CT. His blog is Tech Messages and he Tweets at @mikeoberdick
Blog  |  Website  |  Twitter

Video Games in Teaching - Lessons Learned

Over the years, I’ve worked with a lot of teachers who have expressed interest in using video games in their teaching, but they are not sure how to start, and what their options are.
In this post I’d like to share some tips for success garnered from working with talented teachers who have successfully integrated video games into their teaching.


1) Know where to look, there is a lot of good free stuff out there, but it can be hard to find: iCivics, Playing History, BBC School Games (variety), The JASON Project (science), and PBS Kids (literacy and early math skills), are a few places that will list several games and interactives. These are great places to start to see what is out there. 

2) Know the value and drawback of games. If you want to hear what some academics have to say about it, there are some provocative video clips available from Frontline. Good video games encourage students to make mistakes,good video games give immediate feedback. On the other hand, they divorce kids from solving real world problems and tamper with realistic expectations about the nature of solving difficult problems.

3) You don’t have to jump in with both feet.  If you don’t have one computer per student, there are plenty of ways to integrate games in your classroom. Good games will involve a great deal of decision making on the part of the player. Thus, video games serve as amazing discussion prompts and get students to really open up. By playing with small or large groups of students, students will need to discuss their decision-making strategy with co-players. You can very successfully use games with one computer and a projector or in  small groups working together. If you aren’t ready for large group play, you can communicate availability of these games to parents via your school web page or newsletter. 


4) Kids love transgressive play. Students want to break the rules. They want to re-write history and push the boundaries. When you evaluate games for learning, look at how the game designers foster learning in transgressive circumstances like crashing a roller coaster, reflectively Jamestown to the ground, or legislating the U.S country according to their own values. It is the lack of these opportunities that often differentiate “edu-tainment” from games authentically designed to be true learning experiences. Beware games that enforce skilling and drilling. Plenty of resources already to that. 


5) Use a belt-and-suspenders approach to assessment.  I favor games websites that come with down-loadable curriculum and worksheets. You are still the teacher, not the game, and you need to make students accountable for learning. Create assessments that let students capture and make visible their thinking as they play the game. You’ll promote metacognition for your students and you’ll have evidence that playing the game was time well spent. 
What if Jamestown was settled inland, in the Virginia foothills? Students toy with historical facts and gain a deeper historical understanding in the process.

6) Work closely with your technology support person. Whether the game requires installation or is played online, there might be unforeseen technology barriers. Utilize any technology support available to you or recruit students to test-drive and, if needed,  trouble shoot with you. 

Games on iCivics come with worksheets and lesson plans, allow teachers to take a belt-and-suspenders approach when implementing games. From www.icivcs.org


If you’d like to read about this topic more deeply, I recommend the SIIA’s report on best practices in integrating games in education. Their findings mirror my experiences. All of the games and resources mentioned in this post are available for free. 


About the Guest Blogger
Marjee Chmiel is an instructional technology specialist at Thomas Jefferson High School for Science and Technology in Alexandria, VA. She is a former chemistry and physics teacher.
She is currently a doctoral candidate at George Mason University and blogs about educational technology issues running the gamut from practical to research perspectives at www.marjee.org and you can find her on twitter @mchmiel 

The Arts and History - Part 2

Cover scan of ''The Americans''
1969 2nd printing
from Wikipedia
Robert Frank is one of my favorite photographers - I discovered The Americans in a History of Photography class as an undergrad, and it has resonated with me ever since. Back in the Fall semester of 2009 I was able to take a group of students to the Metropolitan Museum of Art to see the collected photographs of The Americans on display. Here is a story NPR produced about that show, and here is another. This one is from The New Yorker. You get the idea.

When this show was on display, the creators of Selected Shorts aired a program comprised of short stories written by authors who were inspired by a particular photograph from the Frank show. You can download the podcast of the stories being read and have students listen to the readings as part of an examination of the photographs. They could choose their own photograph to be the inspiration for their own creative writing or research or select work from a different photographer or genre all together to inspire their writing. Lots of possibilities!

In a history or American Studies class, these (or any) photographs can be used to identify important moments in US history and the array of perspectives from which the event can be understood. My students used photographs as the starting point for researching and writing historical fiction; working in groups, they shared the historical event which was the focus of their stories, but each author developed a narrator with a unique perspective on that particular event in history.


Here is the outline of the exercise that I presented to the students. Once they selected their groups, identified their event and their narrator perspectives, they had to research to find the authentic answers to these questions about their fictional narrator’s experiences. The students were required to submit an annotated bibliography before submitting their responses to their questions so I could check the sources they were using for depth and accuracy. For citations I usually recommend they use a resource like BibMe, but they prefer EasyBib. When they were ready to began crafting their short story, I provided them this rubric (according to which their final story collections were assessed) and links to several online writing assistants and resources like writing advice from Barry Lane, literacy education online, and the Roane State OWL.
By writing historical fiction students develop research skills, critical reading and writing skills, become intimately familiar with a period of time in history and engage in authentic inquiry. 


About the Guest Blogger, Jacquelyn Whiting:
This is my fourth year as a member of the humanities department at Joel Barlow High School in rural Redding, CT. I have been teaching social studies since 1993 during which time I have taught all different levels of US History including AP, as well as American Government, Art History, Women in American History, Psychology, Environmental Studies and integrated US History and English. My work with my classes is archived on my website: http://jackiewhiting.net as is my contact information. I also write a blog about incorporating digital resources into the study of the humanities, http://www.thedigitalhumanities.com/. I am currently the chair of the professional development committee for my school and offer workshops each year focused on exploring and integrating into the curriculum web resources that enhance our teaching and our students learning. Outlines of and resources for these workshops are also available on my website.

The Arts and History - Part 1

The Topic: Is it Art?
Many lesson series or units can begin with this question and push students at any grade level and in many different disciplines to consider the purpose of art. In some manner we always consider this question at the beginning of the semester in my Art History class, but it also emerges in my US History class as well.

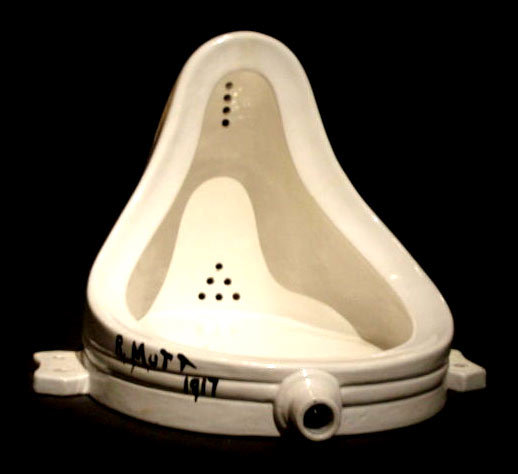
Depending on the grade level and experiences of the students they can consider a host of examples of what is considered art by some critics or audiences but not others, like Marcel Duchamp’s Fountain:

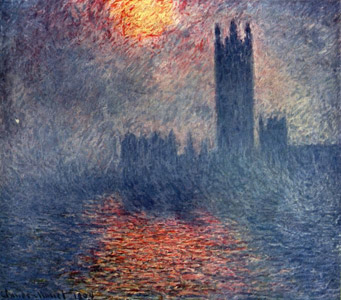
Or art that is valued monetarily and aesthetically today but was criticized and dismissed when it was created:
“The Parliament in London,” Musée d’Orsay, Paris.
The Yorck Project, public domain Wikimedia Commons

This question, what is art?, has even been explored in pop culture outside of the fine arts world. A Murphy Brown episode (“Is it Art?”) was once dedicated to exploring this question as was an episode of The Simpsons (“Mom and Pop Art”). I have used excerpts from both of these shows to stimulate conversation among my high school art history students.

The Method:
Duchamp and Monet have an established place in the art world and art history. To help students explore this question, what is art?, in a way that engages them in their place and time, a debate over the merits and value of street art or graffiti art works well. When asking students to consider these images we begin with this set of questions:

Why do artists make art?
Why do audiences consider it?
Is the role or purpose of the artist to inform? entertain? amuse? enlighten? satisfy?

Wrestling with these questions in the context of selected images helps students gain the vocabulary, insight and vision that allows them to consider What is Art? in an informed way.

Online Resources:

The Brooklyn Museum has an extensive, entirely interactive exhibition about Jean Michel Basquiat. He began as a street artist under the name SAMO and evolved into a member of Andy Warhol’s cohort at The Factory.

Unurth is a site dedicated to displaying street art from around the world. It is built in part by the site owner and in part through submission by site visitors. By clicking on a city, viewers can see a selection of street art from that location. There is a section dedicated to the work of Banksy.

KQED EdSpace in their “Do Now” section pose the question “Is Graffiti Art?” They acknowledge that it is a controversial form of self-expression that is viewed as destructive on one hand and valuable on the other. To inform this discussion KQED offers both a still image and a video based around San Francisco street art.


Curricular Applications:
The examination of graffiti can be an integral part of an art history unit. Or, considering such work - and the ways in which it is exalted and diminished - can be an interesting component in a study of free speech perhaps comparing sanctioned political murals with political graffiti. Or, students could evaluate a work of art or an artist for potential grant funding or write a legal brief for or against the protection of a street art 
display. Similarly, the issues raised by street art (censorship, isolation, youth and rebellion, social and political commentary) resonate through many selections of literature from the 20th Century. A consideration of street art could be a springboard into or companion to a literary exploration. 


About the Guest Blogger, Jacquelyn Whiting:
This is my fourth year as a member of the humanities department at Joel Barlow High School in rural Redding, CT. I have been teaching social studies since 1993 during which time I have taught all different levels of US History including AP, as well as American Government, Art History, Women in American History, Psychology, Environmental Studies and integrated US History and English. My work with my classes is archived on my website: http://jackiewhiting.net as is my contact information. I also write a blog about incorporating digital resources into the study of the humanities, http://www.thedigitalhumanities.com/. I am currently the chair of the professional development committee for my school and offer workshops each year focused on exploring and integrating into the curriculum web resources that enhance our teaching and our students learning. Outlines of and resources for these workshops are also available on my website.

Monday, February 20, 2012

Flipping Your Classroom With Free Web Tools - Guest Post

The Flipped Classroom is gaining steam in schools across the world. Flipped classes focus on student interaction and engagement in class and a major component is the technology that can be used to create, deliver, and collaborate. Richard has posted on many of these tools, so I’ll be sharing how I use a combination of tools in a typical unit.

Writing
GoogleDocs has been a lifesaver for me. I’m always moving between machines, so I rarely store data locally. All of my written material is done with Google. I use Docs and Presentations to create and share the content with students. I also use GoogleDocs for students to write collaborative lab reports or research presentations  to cut down on paper used in class. Last year, my AP Chemistry class wrote and edited a lab manual using only GoogleDocs.

Recording
A Flipped Classroom uses screencasting or podcasting to deliver direct instruction when appropriate. After I’ve decided what to record, I write up some notes and then make a video. There are tools available for purchase, but when money is short, there are plenty of free options available on the web. While you can record for free, many have a time limit, which is a good thing. The best videos are less than 10 minutes long.

Screencast-o-matic and Screenr are probably the best two web apps available. Screencast-o-matic has a Pro account that will host your files, while a normal Screenr account will do the same. Educreations is another, newer screen recording site that gives you a blank canvas in a browser window. You can annotate and record in one place for free. All give an option to download the videos.

Jing is a free download and runs locally on your machine rather than as a web app. With your account, TechSmith hosts all your videos on screencast.com. With YouTube blocked in many districts, this is a good alternative.


For Inspiration Only, Flickr CC
Annotating
Typically, screencasts are composed of a PowerPoint or PDF file being annotated and narrated by the teacher as they would in class. If your school is already equipped with Promethean or SMART products, you can record and annotate using their software. If you don’t, I would recommend searching on Craigslist or eBay for a used pen tablet, similar to the ones produced by Wacom. They usually retail for $80 - $100, but I found mine on Craigslist for $30. Many teachers don’t annotate, and simply record a presentation, so a tablet isn’t vital.

To annotate a PDF for a recording, I use a program called Jarnal. It is a free download running through Java on your machine that allows you to write on top of PDF files. You can then save and export an annotated PDF for archive, printing, or sharing to the web. FormulatePro is similar to Jarnal, but runs as a standalone application on your computer.

Sharing
After everything is recorded, I share my content. I use Wordpress to run my class website. Others use GoogleSites or Moodle through their school. The important thing is to use what you already have to distribute content. A web space is important because it allows for 24/7 access by students.

Student creation is another very important part of a flipped class. Students make their own podcasts, create presentations, or even make websites with what they’ve learned. They can then share their work with people around the world. Ownership and relevance are accentuated and engagement rises. The appropriate use of technology in a flipped classroom is much more powerful than the technology alone. 


About the Guest Blogger
Brian E. Bennett is a science teacher living in Evansville, IN. He uses a Flipped Classroom with biology and chemistry students to expand their technology skills and to build global connections. He currently blogs on Educator, Learner about science, technology, education policy, and teaching. You can catch him on Twitter, @bennettscience or on Google+.